No products in the cart.
Easiest Car Sunshades to Install and Remove

The Best Easiest Quickest Car Sunshades to Install and Remove (No Tools, No Fiddling, No Patience Required)
Words by Qualizzi
Abstract. This article compares how different types of car sunshades are installed and removed in real life — not in a product photo, but in a parking lot with kids waiting. It explains why some types take seconds, and others take minutes, which ones stay put and which ones need constant reattachment, and why installation ease matters far more than most buyers expect.
Why installation matters more than you think
Nobody buys a car sunshade because they enjoy installing car accessories. They buy one because the sun is blinding their child, their dog is overheating, or the back seat feels like the inside of a toaster. The shade is supposed to solve that problem and then disappear from your attention.
But here is what actually happens with most sunshades: the first installation takes longer than expected. The shade does not quite fit. Something needs aligning, sticking, clipping, or pressing into place. You get it on, it looks acceptable, and you move on with your life.
Then the shade falls off. Or you need to remove it to open the door properly. Or a passenger pulls it aside, and now it is crooked. Or you park in a new spot, and the sun is on the other side of the car, so you need to move the shade. Each time, you are back to square one — reinstalling a product that was supposed to be a set-and-forget solution.
This is why installation is not a minor detail. It is the single biggest predictor of whether a sunshade stays in use or ends up in the boot, forgotten. A shade that takes 30 seconds and never needs redoing will be used every day. A shade that takes two minutes and needs readjusting every trip will be abandoned by week three.
How each sunshade type actually installs
Here is the honest version of what installation looks like for each sunshade category — not the version from the product listing, but the version from the car park.
Static cling shades. Peel the backing off (if there is one), press the sheet against the glass, smooth out the bubbles, and hope it holds. On a clean, cool window, this can work passably. On a hot window, a dusty window, or a window with any curvature, the cling starts failing almost immediately. One corner lifts, then another, and within a few drives, you are pressing it back on every time you get in the car. Installation time: 1–2 minutes. Reinstallation time: every few days.
Suction cup shades. Press each suction cup against the glass until it grips. Position the shade so it covers the right area. Adjust if it is crooked. Count to ten and see if anything has already popped off. On a good day, this takes about a minute. On a bumpy road, the suction cups start losing grip within a few trips. Installation time: 1 minute. Reinstallation time: frequently.
Magnetic shades. Align the magnets with the metal sections of the door frame. Adjust until the shade sits flat and covers the window evenly. Check for gaps along the edges. If the frame is not fully metal or the trim gets in the way, rearrange and try again. Installation time: 1–3 minutes per window, depending on fit. These tend to stay on once set, but removal and reinstallation are fiddly if you need to do it often.
Snap-on or clip-on shades. Line up the clips with the window channel or frame edge. Press or snap into position. Check that each clip has engaged properly. If the shade is vehicle-specific and the fit is good, this can be straightforward. If it is a generic design, expect trial and error. Installation time: 1–3 minutes. Stays on well when compatible.
Retractable roller shades. Mount the roller mechanism to the door panel or window frame (some require adhesive, some use clips). This is a one-time installation, but it takes 5–10 minutes and sometimes a screwdriver. Once mounted, the shade pulls down and retracts easily. The initial setup is the barrier — and if the adhesive fails or the clip does not fit, you start over. Brands like Sfee and YAADUO sell common versions of this type on Amazon. Installation time: 5–10 minutes the first time, then 2–3 seconds to deploy.
Blackout covers and curtains. Attach velcro strips, clips, or wire frames to the door interior. Align the cover. Adjust for full window coverage. This is usually a 5–10 minute installation per window, and some designs require small tools or adhesive strips that leave residue. Brands like Epltion offer popular versions of these for camping and privacy use. Once set up, deployment can be quick — but the initial setup is not casual. Installation time: 5–10 minutes first time.
Sock-style mesh shades. Open the car door. Stretch the shade over the top of the door frame. Pull it down over the sides. Close the door. Done. No tools, no clips, no adhesive, no alignment, no magnets, no pressing, no smoothing. The elastic mesh grips the frame by tension and stays there. Installation time: in as little as 4 seconds (typically 4–12 seconds depending on the user’s age, demonstrated in real-life videos).
The reinstallation problem
First installation gets all the attention. Reinstallation is the thing that actually determines whether you keep using the shade.
Every sunshade type can be installed once. The question is: how often do you have to do it again?
- Cling shades: Reinstall every few days as adhesion weakens, or every time they fall off on a bumpy road.
- Suction cup shades: Reinstall after every drive where a cup pops off — which, depending on road conditions, can be every drive.
- Magnetic shades: Rarely need reinstalling, but removal for cleaning, car washes, or swapping sides means going through the alignment process again.
- Snap-on shades: Stable once clipped, but removal and refitting require re-engaging each clip, which adds up over time.
- Roller shades: No reinstallation needed once mounted — but if the mount fails, you are starting the full 5–10 minute setup from scratch.
- Sock-style mesh shades: Reinstallation is the same as the first installation — 4 seconds. But because the shade stays on through door open, window movement, highway wind, and door slams, most people rarely need to reinstall at all.
This is why a shade that takes 4 seconds to install and rarely needs reinstalling is vastly more convenient than one that takes 2 minutes to install but needs redoing every week.
How Qualizzi sunshades install in about 4 seconds
The process is three steps:
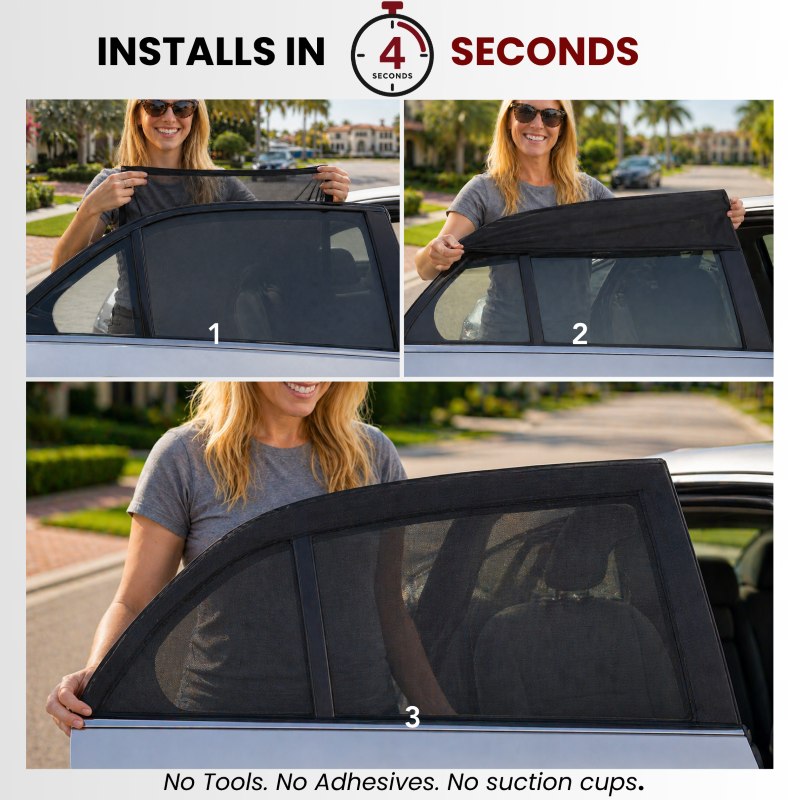
Qualizzi Sunshades Install in 4 seconds, instructions
- Open the car door.
- Stretch the Qualizzi shade over the top of the door frame and pull it down the sides. The elastic mesh grips the frame immediately. No clips, no tools, no adhesive.
- Close the door. The door edge presses the mesh into the frame seal, locking it in place.
That is the full installation. There is no step four.
Once installed, the Qualizzi shade stays on through:
- Door opening and closing — the elastic re-grips the frame each time
- Window rolling up and down — the glass moves between the mesh layers without affecting the shade
- Highway driving — the mesh is tensioned around the frame, not held by adhesion or suction, so wind does not dislodge it
- Bumps and vibration — no suction cups to pop, no cling surface to peel, no clips to rattle loose
And because Qualizzi offers 9 sizes — from M to XXXXL — the shade can be matched to the actual window dimensions. A correct size means the elastic tension is right: tight enough to stay on, not so tight that it is difficult to stretch over the frame. This is why sizing matters for installation. A poorly sized shade, whether too large or too small, makes the 4-second process harder than it needs to be.
Installation comparison table
| Type | First Install Time | Tools Needed? | Reinstall Frequency | Stays On While Driving? | Window Still Works? |
|---|---|---|---|---|---|
| Qualizzi (Sock Mesh) | ~4 seconds | None | Rarely | Yes | Yes — fully |
| Static Cling | 1–2 minutes | None | Every few days | Sometimes | No |
| Suction Cup | ~1 minute | None | Frequently | Unreliable | No |
| Magnetic | 1–3 minutes | None | Occasionally | Usually | Rarely |
| Snap-On / Clip | 1–3 minutes | None | Occasionally | Yes | Rarely |
| Retractable Roller | 5–10 minutes | Sometimes | If mount fails | Yes | No |
| Blackout Cover | 5–10 minutes | Sometimes | If velcro/clips fail | N/A (parked use) | No |
Installation safety: what you should not have to deal with
Installation ease and installation safety are two sides of the same coin. A sunshade that requires tools, force, or awkward body positions to install is not just inconvenient. It carries real risks:
- Spring-loaded frames can snap shut on fingers during setup. The coiled wire stores significant tension, and if it slips while you are positioning it, the metal edge can pinch or cut skin.
- Clip-on and snap-on shades require pressing hard plastic clips into metal window channels. Fingers can slip off the clip and scrape against sharp trim edges, especially in hot weather when sweat reduces grip.
- Roller shade mounting sometimes requires a screwdriver or adhesive application in an awkward position inside the car. Overhead work inside a hot vehicle is uncomfortable at best and a safety concern for anyone with balance or mobility limitations.
- Suction cups themselves are not dangerous. But the repeated bending and reaching into the back seat to restick fallen cups, often while a child is already buckled in, puts the installer in awkward positions and creates a distraction.
Qualizzi shades eliminate all of these scenarios. The installation is a controlled stretch of soft spandex mesh over a smooth door frame, done from outside the car while standing upright. No tools. No force. No sharp edges. No spring tension. No reaching into the back seat. No kneeling, bending, or overhead work. It is one of the safest installation methods of any car accessory, not just sunshades, because there is genuinely nothing in the process that can cause injury. 4 seconds, zero risk.
Removal and storage
Installation is half the equation. The other half is what happens when you need to take the shade off — for a car wash, for lending the car to someone, for switching the shade to a different vehicle, or just for storing it over winter.
Cling and suction cup shades come off easily but often leave residue or lose adhesion after repeated removal cycles. Once a cling shade has been peeled off and reapplied a few times, its grip weakens permanently.
Magnetic shades lift off cleanly, but storing them without bending or damaging the magnetic strips requires some care. They also attract dust and metal debris when not in use.
Snap-on shades unclip and store flat, but the clips can weaken with repeated use and some leave marks on the window channel over time.
Roller shades retract into their housing, which is tidy — but removing the entire mechanism for a car wash or vehicle change means undoing the original mount.
Qualizzi shades slip off the frame in about 2 seconds. They fold flat or roll up into a small package. No residue, no marks, no tools for removal. They are also machine washable — which matters over time, especially with kids or pets in the car. When you need the shade again, it is the same 4-second install. There is no degradation from repeated install-remove cycles because the attachment method is elastic tension, not adhesion.
Frequently Asked Questions
How long does it take to install Qualizzi sunshades?
About 4 seconds per window. Open the door, stretch the shade over the frame, and close the door. No tools, no clips, no adhesive. It is the fastest installation method of any aftermarket car sunshade type.
Do I need any tools to install Qualizzi shades?
No. The shade is a single piece of elastic mesh that stretches over the door frame by hand. There is nothing to screw, clip, stick, or align.
Do Qualizzi sunshades stay on when I open and close the door?
Yes. The elastic mesh grips the frame. Opening the door releases the compression from the door seal, but the elastic tension keeps the shade on the frame. When you close the door again, the seal re-compresses the mesh into place. The shade stays through normal daily use — door cycles, window movement, highway speed, and bumps.
Can I move Qualizzi shades between different cars?
Yes, as long as the window dimensions are similar. Since the shade is held by elastic tension and not vehicle-specific clips or magnets, you can remove it from one car and install it on another in seconds. Qualizzi offers 9 sizes, so the same shade will fit any window within its size range regardless of vehicle brand or model.
How do I remove Qualizzi shades for a car wash?
Open the door and pull the shade off the frame. It takes about 2 seconds. After the wash, stretch it back on — another 4 seconds. No residue, no marks, no parts left behind on the car.
Will a car sunshade damage my car’s door seal or paint?
Sock-style mesh shades like Qualizzi sit against the rubber door seal and the painted frame. The mesh is soft spandex, and the elastic band applies gentle, even pressure — similar to a fitted fabric cover. There are no adhesives to leave residue, no suction cups to mark the glass, and no clips to scratch the frame. Qualizzi shades have been designed to be installed and removed repeatedly without affecting the vehicle.
What if the shade doesn’t fit my window properly?
Fit depends on choosing the right size. Qualizzi offers 9 sizes from M to XXXXL with a sizing guide based on window measurements. If the shade is too large, it will bunch and look loose. If too small, it will be difficult to stretch over the frame and may not cover the full window. Measuring before ordering takes two minutes and makes the 4-second install work as intended.
Final thought
The best car sunshade is the one that actually stays on your car. Not the one sitting in a drawer because it fell off twice and you gave up. Not the one you left in the boot, because reinstalling it takes longer than the drive to school.
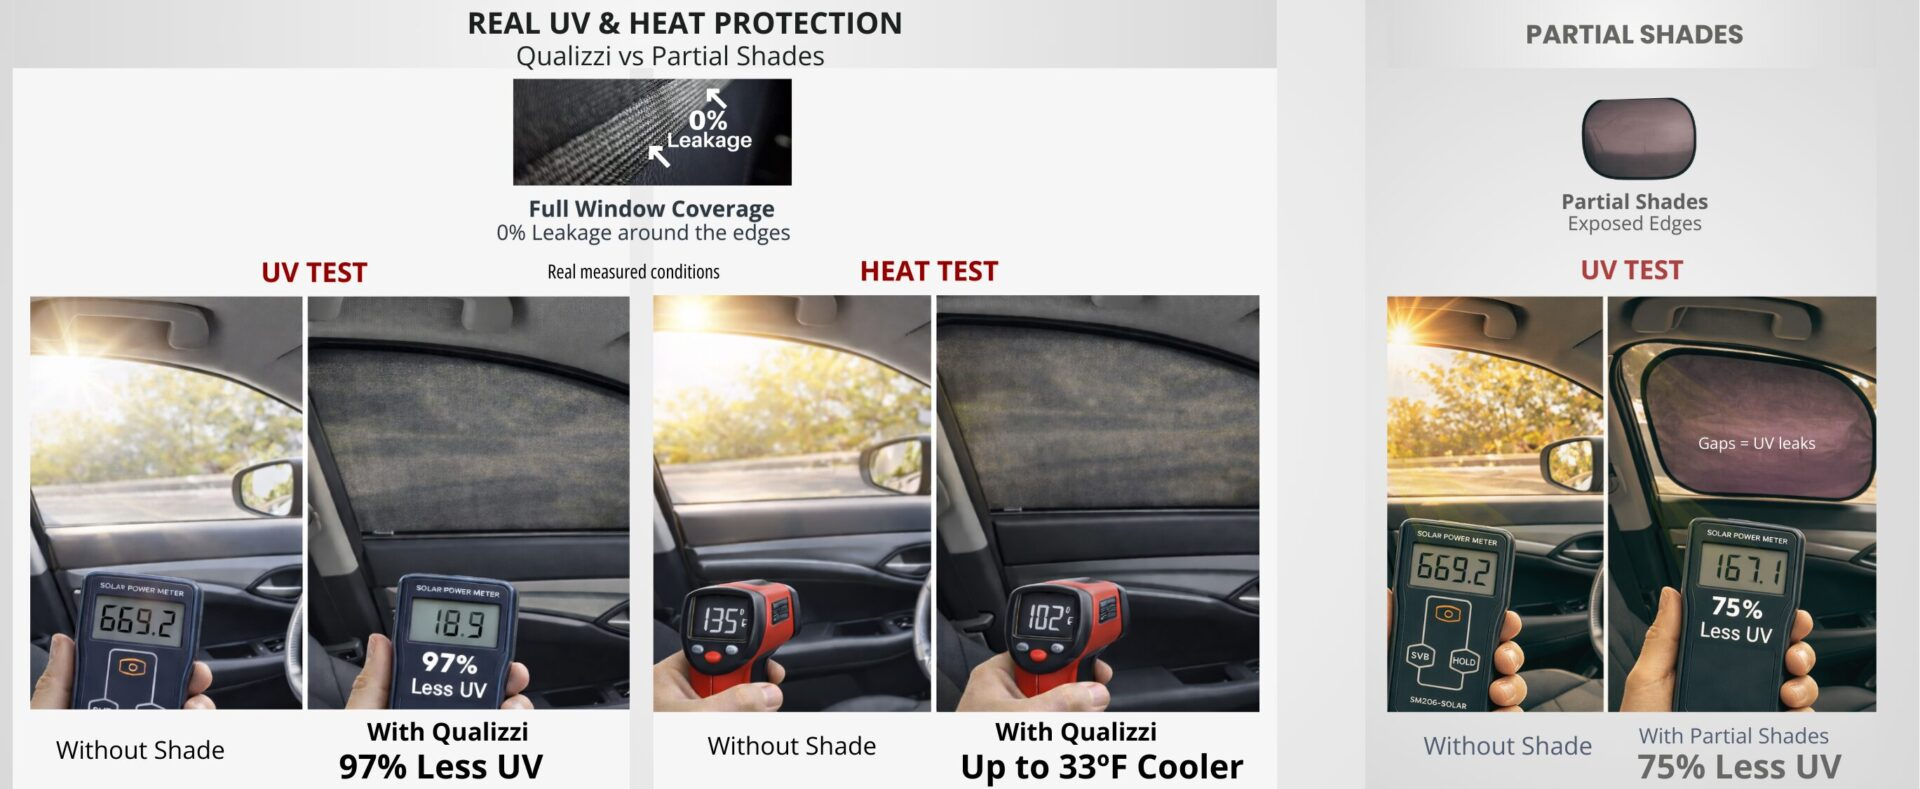
Installation ease is not a detail. It is the reason a shade gets used every day or gets forgotten. Qualizzi shades take 4 seconds to install, stay on without maintenance, survive doors, windows, wind, and kids — and come off in 2 seconds when you need them to. Nine sizes, double-layer 40D spandex mesh, 97% UV blocking in a real-world test, and the fastest install in the category.
Find the right size for your vehicle on the Qualizzi website or the Qualizzi Amazon store.
car shade that doesn't fall offcar sunshade easy to put on and removecar sunshade that stays oncar window shade no toolscar window sun shadeseasiest car sunshade to installfull coverage car shadehow to install car window shadequalizziqualizzi installationqualizzi sun shadesquick install car shadeslip on car sunshadesock style car sunshadetypes of car shades